LED Flood light installation: how to wire LED flood lights
LED floodlights are a great option for enhancing the security surrounding your property of a night-time. You can also use them for decorative purposes; to light up your outdoor parties and events held at night; to illuminate the walkways and steps leading to your front door, so you don’t break your neck when stumbling home late at night – and much more. Once you’ve gone out and purchased the set of floodlights that you think are right for you, there remains the task of wiring them. This may seem a daunting task if you don’t have much experience with this sort of thing. Fortunately, though, this is an easy job that you can do yourself in a short space of time and with the minimum number of tools. Here are the steps to follow:
- Work out where you want to place the flood lights. This will depend on what you are using your lights for, eg for security purposes, or perhaps just to highlight your landscaping and flowerbeds. But generally speaking, LED flood lights will work most effectively when placed towards the corners of your buildings (where the lighting tends to be most inadequate), and are positioned up near the roof. If you install them too close to the ground, you won’t get as much coverage – although they will certainly be easier to install, since you won’t need to get up on a ladder to wire your lights (NOTE: if you do need to get up on a ladder, have someone help you out by holding it at the bottom, just to be on the safe side). Before proceeding, you will need to determine exactly where the lights will be placed, whether the wires can access that area, the route the wires will take from the power outlet to the light, whether or not they will they get in the way etc. A sound piece of advice is to draw a map of the whole set-up in advance to help you.
- Remember to turn off the power! Switch off your electricity using the main power switch on your home’s circuit breaker box/ control panel in order to avoid any electrical hazards or accidents. Your own safety is paramount and you don’t want to be working around a live power source as you fiddle around with electrical wires. Neither do you want a power surge that affects your household’s electricity supply.
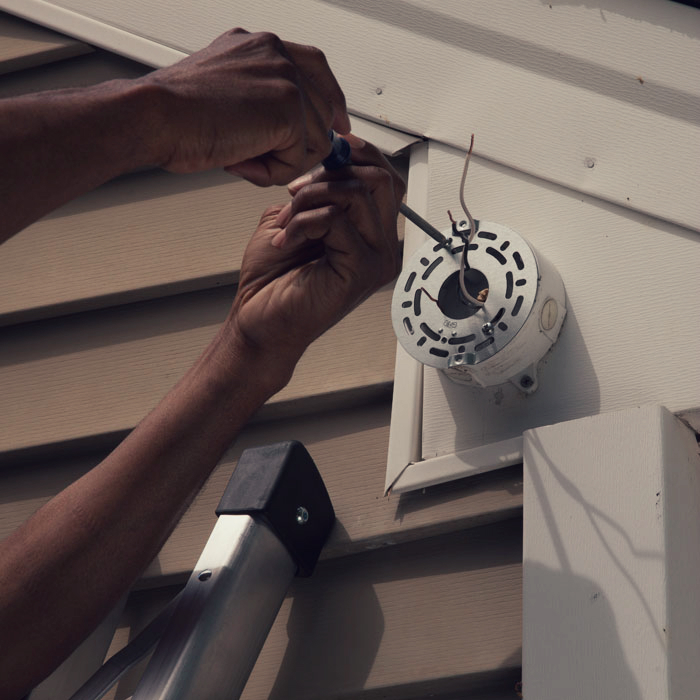
- Find the electrical outlet closest to where you intend to locate your floodlight, unscrew the outlet face and attach the wire. Ensure you keep the colors matched: black wire goes with black wire, and white wire goes with white wire.
 Take the other end of the wire that you’ve just hooked up to the outlet, and proceed with it to the desired location of your switch. It should be somewhere that is easy to access for you and your family – but not strangers passing by. Remember as you go to secure the wire to the walls or floor using store bought wire clips, spaced two to four meters apart; these can be hammered in or stapled down. Again, your safety and that of your family is paramount! You don’t want anyone tripping over an errant wire and breaking their neck!
- Install your switch, by inserting the black wire into the designated holes in your switch, then securing it by tightening the screws in the holes. Meanwhile, with the white wire, connect to the following section of white wire using electrical tape plus wire caps.
- Now connect your wire to the flood light itself. Again, staple down the wire to the wall or floor using wire clips as you go, before attaching the wire to the flood light using electrical tape and wire caps. As before, make sure you match the colors of the wires, black to black, white to white.
- Test it out! Turn the switch that you have just installed to the off position, then screw the outlet face back into place. Next, turn the mains power back on and turn the switch back on to see if you’ve wired your light correctly. If it lights up no problems, then you are in the all clear.
- Ask for help if you need it: throughout this post we have emphasized that installing your floodlights is a straightforward task that anyone can do with the right tools and some time to spare. However, if you in any way lack confidence in yourself and your ability to complete the job – or if you fear getting on top of a ladder! – don’t hesitate to hire a professional to install your flood lights. Better to be safe than sorry!
- Another tip: LED lights draw a lot less energy than incandescent lights, which have a very heavy power draw. On their own, there aren’t likely to be any issues with the circuit breaker when installing your LED lights. However, if you are installing multiple floodlights, especially if you are trying to connect several LED and incandescent flood lights together, there is a possibility that the incandescent flood light will draw too much power for the LED to deal with, so that it overloads and is destroyed. To avoid this unwelcome possibility, always run your LED lights and incandescent bulbs from separate power outlets.
- Finally, before you finalize everything and caulk and seal the space between the flood light mounting frame and the wall, thoroughly ensure everything is working as desired. It’s much harder to make adjustments once you have finalized the installation.
As we have seen, wiring your outdoor flood light is a pretty easy task that shouldn’t take more than a few minutes. Anyone can do it, and only a handful of tools are required (electric wire, wire caps and clips, electrical tape, hammer and a screwdriver). If you follow all the steps presented here, you’ll have your outdoor flood lights up and running in next to no time.


Your picture shows an aluminum ladder being used to do electrical work. This is unsafe. It should be wooden or fiberglass.